Veröffentlicht am Schreib einen Kommentar

How to make glittered lemon ornaments • DIY video tutorial

How to make glittered lemon ornaments DIY

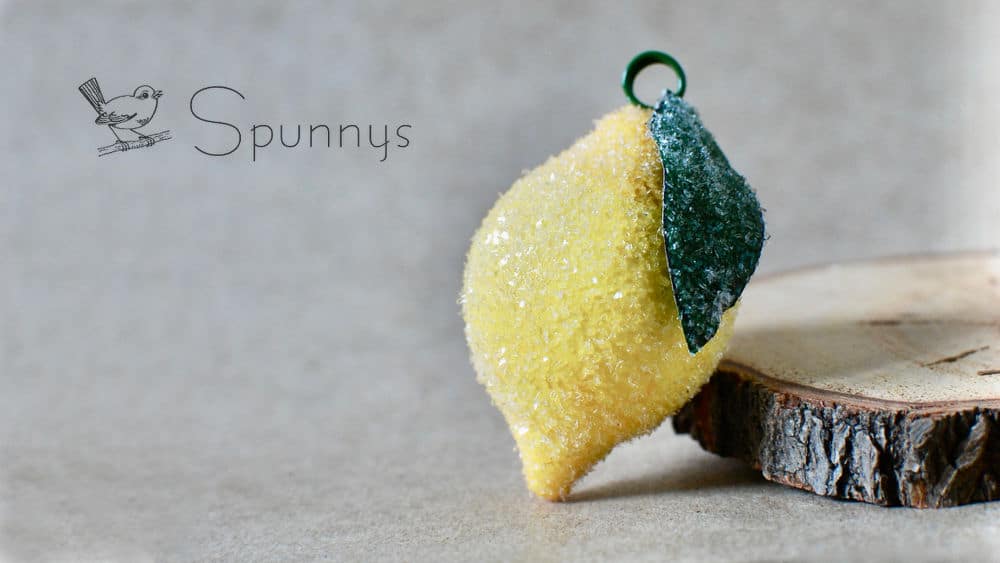
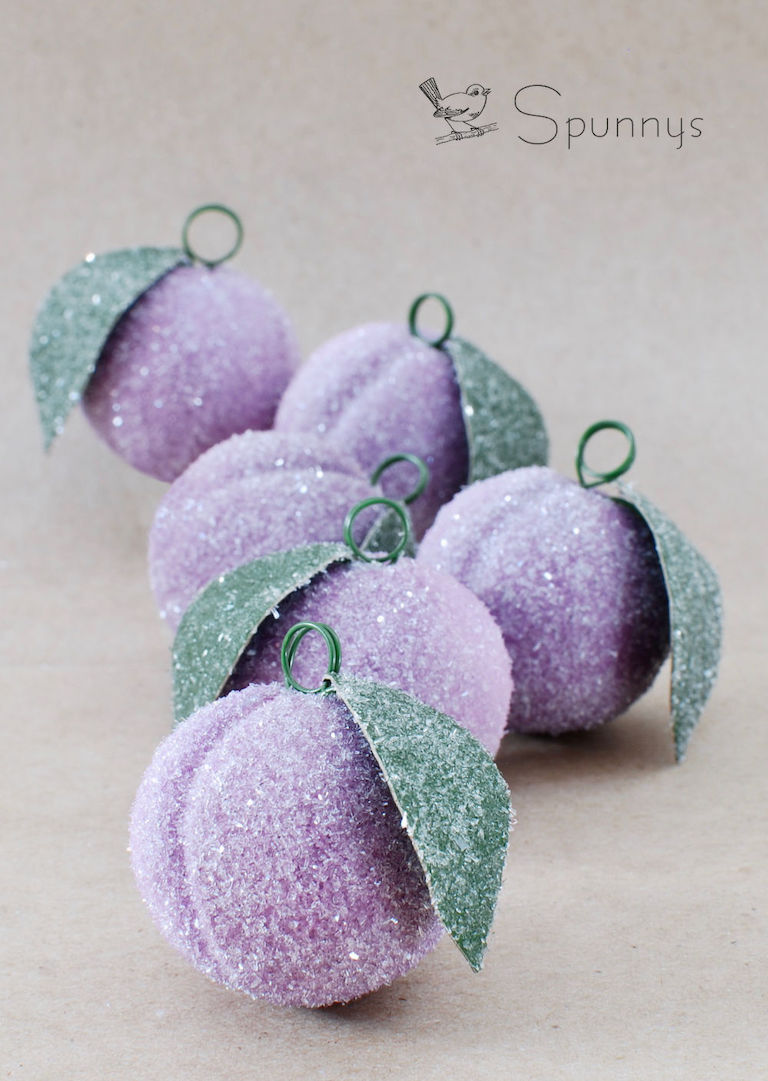
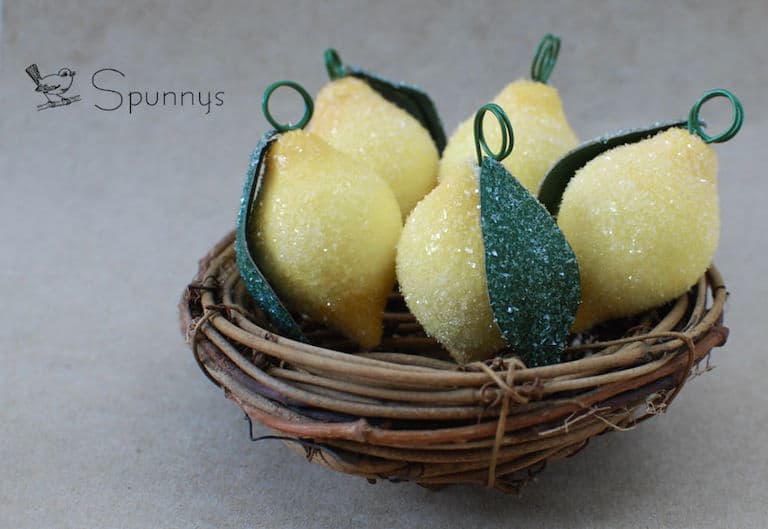
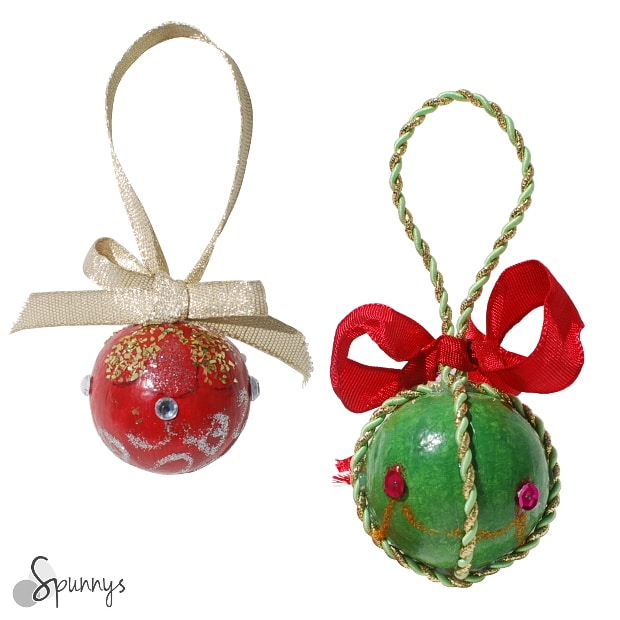
Watch our video tutorial and learn how you can make beautiful glittered lemon ornaments from SPUNNYS blank spun cotton lemon shapes. Your ornaments will have the look and feel of those prized vintage spun cotton ornaments handcrafted back in the late Victorian era.

You can use the lemon ornaments to decorate the Christmas tree but you can also hang them around the house any time of the year and add a touch of retro chic to your home.

Note that you can also purchase the finished glittered lemon ornaments from our online store if you are short on time or if you would like to make a gift to somebody. We ship all over the world and can make the glittered ornaments to order if our stock is low. Simply contact us at nicolas@spunnys.com.

List of materials

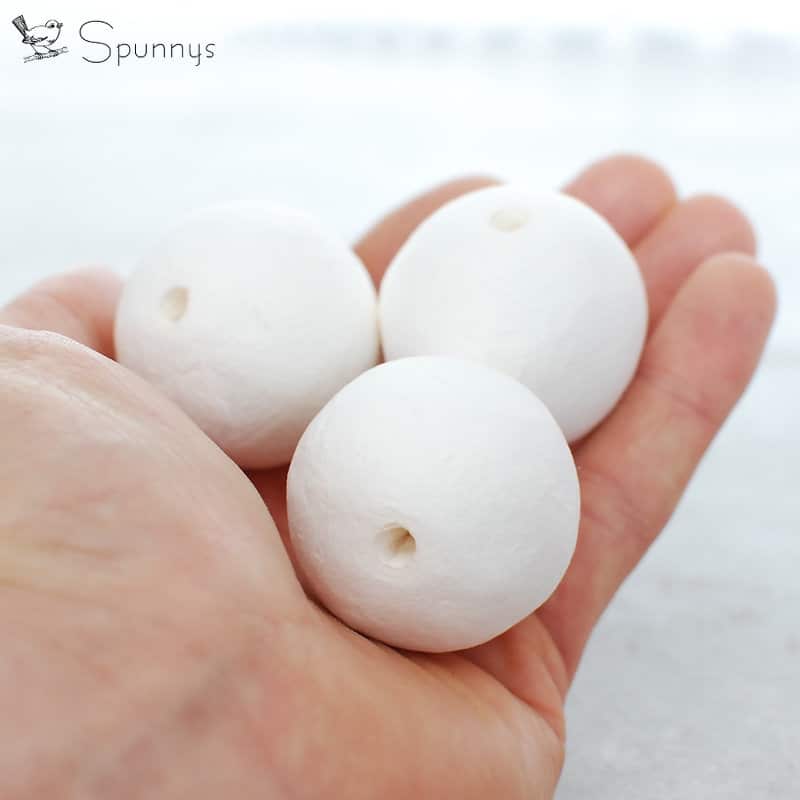
  • Spun cotton lemon blanks
  • Glass glitter *
  • Wooden picks (bamboo skewers work great)
  • Acrylic paint (yellow, and orange) and paintbrushes
  • Green card stock for the leaves (you can also paint white card stock green)
  • Small bowl and spoon
  • Scissors and wire cutters
  • Liquid white craft glue

(*) If you prefer not to use glass glitter, you can use alternatives such as glitter made with resin (PET).

Glittered lemon ornaments: step by step instructions

In addition to the video, we thought it would be useful to also provide you with written instructions, this way you can print out the tutorial and have a paper version.

Step 1 : paint the lemons

Hold the lemon blanks with a stick and paint them a solid yellow. Before the yellow paint dries, add a touch of orange at the tips. The transition from the yellow to the orange should be as smooth as possible.

Step 2: Make and paint the leaves

From the green card stock, cut out a marquise shaped leaf approximately 6 cm at the longest x 2.1 cm at the widest. Instead of using green card stock, you can also use white card stock and paint it green. This way you can create the perfect citrus leaf shade of green. Do not forget to paint both sides of the card stock green.

Use the wire cutters to snip 6cm pieces of green metal floral wire.

Glue the pieces of floral wire to the back of the leaves, make sure to let the metal overhang by 1.5 cm.

TIP: Use your paintbrush to apply the glue to the floral wire pieces. Rinse your paintbrush immediately after.

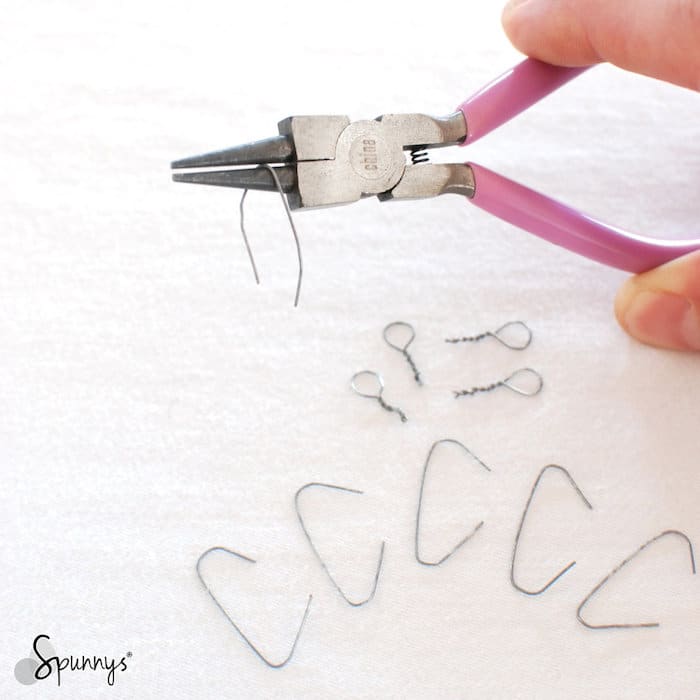
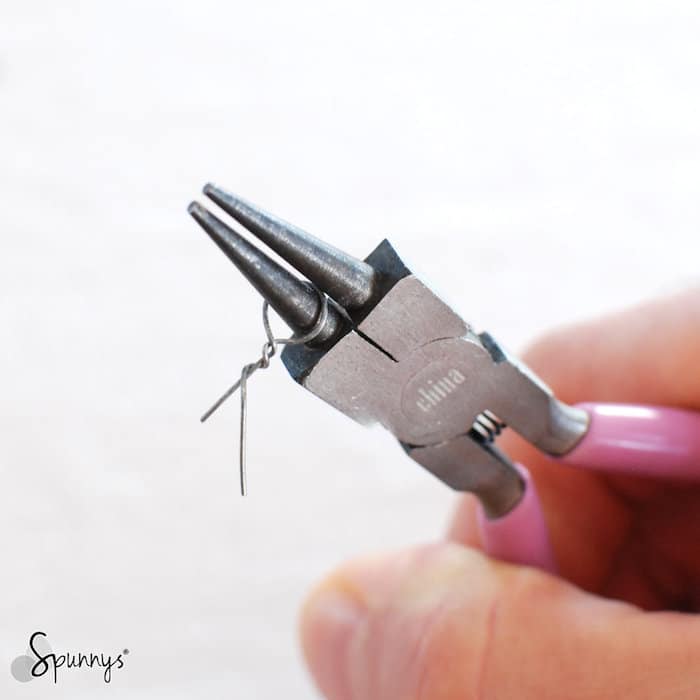
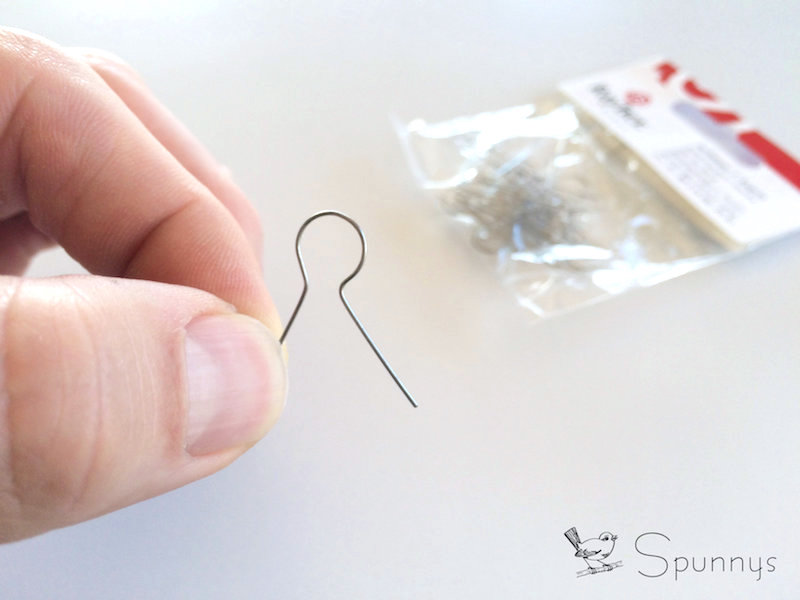
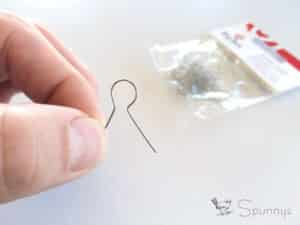
Step 3: Prepare your hanging loops

Use the wire cutters again and snip 8cm pieces of the floral wire.

Firmly wrap the pieces of wire twice around the handle of your paintbrush to create the loops. Then cross and twist both ends together about 3 to 4 times. The twisted part should be about 1.5-2cm long, cut the excess if necessary.

TIP: You can vary the diameters of your hanging loops by twisting the floral wire around the wide part or the narrow part of your paintbrush handle.

Step 4: finish your leaves

When the glue on the leaves is dry, bend the overhanging pieces of wire almost 180 degrees so you can insert them into the holes of the lemons later.

TIP: bend the wire pieces around your paintbrush for a perfect bend.

Step 5: glitter time!

Start with the leaves. With the paintbrush, generously coat the top sides of the leaves. Then, over the bowl of glitter, scoop glass glitter over the freshly glued sides of the leaves until completely coated. Finally, shake or tap off any excess glass glitter. Let dry.

Proceed exactly the same way with the lemon bodies. Remember to use a generous amount of glue.

Step 6 (final) : Attach the leaves and hanging loops to the lemon bodies

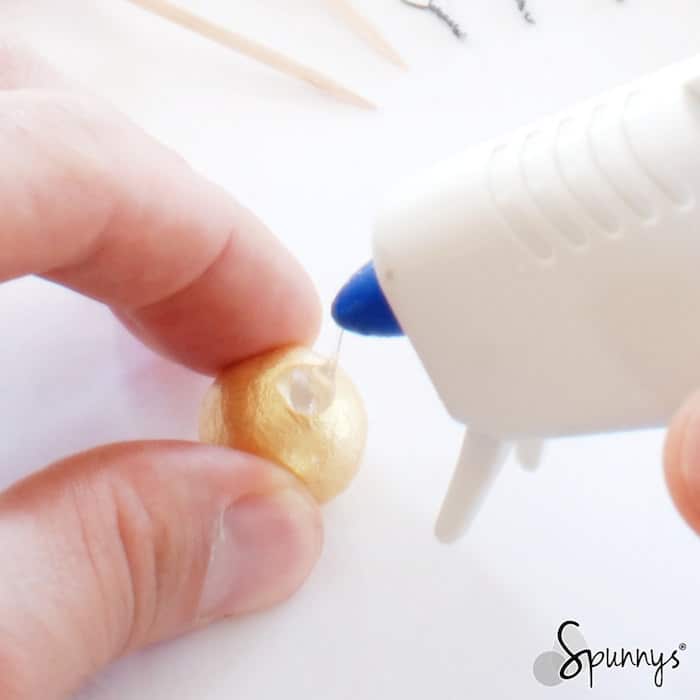
Start with the leaves. With the paintbrush, apply a generous amount of glue to the exposed portion of the floral wire. Then, directly insert into the hole.

When you are done, apply a generous amount of glue to the the twisted stem of the hanging loop. Then again, directly insert into the hole

TIP: use a twisting motion to insert the hanging loop.

Let dry and you are done!

how to make glittered lemon ornaments from spun cotton

Veröffentlicht am 4 Kommentare

How to make Vintage Angel Ornaments – two simple DIY tutorials

Vintage angel ornaments DIY tutorials

Check out our two tutorials and learn how you can make your own Vintage Style Angel Ornaments.

The two tutorials are quite different. The angel ornaments from the first tutorial have fluffy heart shaped wings, and beautiful lace gowns whereas the angel ornaments from the second tutorial have a gorgeous traditional look in which lace is the star of the show.

Tutorial 1: Heart-shaped wings Vintage Angel Ornaments

vintage angel ornaments pipe cleaners christmas

Project materials list

  • Blank Spun Cotton Figurines (cone fellow – small).
  • Bump white pipe cleaners (one strand per angel).
  • Gold, or yellow, or beige pipe cleaners for the angel halos.
  • White craft tacky glue.
  • 1 1/2 “ wide Ruffled lace, about 4 1/2 inches per angel.
  • A pair of wire cutters.
  • Acrylic paint for the angel faces. Your choice of color.
  • A black ball pen to draw the eyes and the mouths.
bump chenille
White bump pipe cleaner (chenille)

Step by step directions

1: Gather your materials.

2: Paint the heads of the angel ornaments in one solid color.

home decor angel ornament DIY

3: With the black ball pen, draw the mouths and the eyes.

4:. Pour glue on your figurine bodies.

Christmas crafts angel ornament

5: Dress each figurine with a 4.5″ long piece of lace. Make sure the ends of the lace meet in the back (you can use a paper clip to keep them together).

6: When the glue is dry, remove the paper clips and pour a small bead of glue on each side of the figurines.

7: Fold the lace over the two beads of glue.  The lace endings are now pointing forward.  Keep the lace in this configuration until the glue is dry. You can use a small paper clip.

Learn to make angel ornaments

8: While the glue dries, you can work on the halos. Just create a loop with a piece of pipe cleaner, twist the ends together a few times, and cut off the excess.

9: Glue the halos to the angel heads. Try to use as little glue as possible so as not to leave any glue marks.

10: Let your ornaments rest a little until the glue under the halos and the glue under the lace pieces is dry.

11: Remove the paper clips and pour two more beads of glue on the sides of your dolls.

12: Fold the lace ends back and keep them in this position with a rubber band. Let dry.

13: Almost done. Bend the white bumpy pipe cleaners into heart shapes. Twist the ends together.

14: Cut off the excess pipe cleaner with a wire cutter.

15: Final gluing. Pour two good size beads of glue on the back of your ornaments.

16: Gently add the wings to your angels. Make sure they are centered

17: Rest your ornaments in a safe and quiet place until the glue is dry :)

YOU ARE DONE :)

Tutorial 2: Traditional Vintage Angel Ornament

Vintage inspired angel ornaments DIY

Project Materials:

– A 30mm spun cotton ball for the head. They are lightweight and easy to draw on.
– A piece of lace about 2 feet long and 3 1/2″ wide.
– A crylic paint for the head (I used a pale yellow color).
– A black ball pen (for the eyes) and a red ball pen (for the mouth).
– A piece of ribbon (about 10″ long)
– A bamboo skewer (a toothpick would work too).
– A pair of scissors and a stapler.

vintage angel ornaments lace
The lace I used

Step by step directions:

  1. Paint the ball in one solid color and let it dry. To give the skin color a vintage look, use a pale washed off color such as pale brown, yellow or pink.
  2. Cut your lace into three pieces:  one long 12″ long piece (the body) and two short 5″ long pieces (the wings).
  3. Prepare the wings. Fold a short piece of lace into an accordion fold and staple one end. Repeat with the other wing.
  4. Prepare the body: Wrap the long piece of lace around the bamboo skewer making sure to create pleats as you go. Tie a piece of ribbon around the lace to secure it into place.
  5. By now the head should be dry. With the two pens, draw the eyes and mouths.
  6. Slide the wings down on the pointy end of the bamboo skewer. Roll the bamboo skewer through your fingers to help.
  7. Add the angel’s head

You are done :)

I hope you enjoyed these angel tutorials and are ready to embark on your own vintage angel ornament projects. As usual, do not hesitate to ask questions, we are always happy to help. Happy crafting!

Veröffentlicht am 4 Kommentare

How to make spun cotton ornaments from blank spun cotton shapes

Spun cotton ornaments - how to make

You can make beautiful, vintage style spun cotton ornaments from blank spun cotton shapes. In this tutorial, we will explore basic craft techniques and present you with some of our favorite creations. The making of each of the following ornaments will be explained in more details further down.

Spun Cotton Ornaments – A little history

Spun cotton ornaments, originated in the Saxony region of Germany back in the second half of the 19th century, during the late Victorian era. These old fashioned beauties were made with cotton batting (and sometime wool batting too), a fluffy, raw looking material made of non woven fibers.

People in those days would wrap and press the cotton batting, by hand, around a metal wire frame. Next, they would cover the ornaments with a starchy liquid to give them a smooth workable surface. Finally, when dry, they would paint the ornaments, and decorate them with glitter, home made paper trimmings, and even cut out paper faces.

Traditional spun cotton ornaments were made during the Holidays to be displayed on the Christmas tree. Families would fashion ornaments in the shape of fruits, angels, children, Santa Claus, and even animals.

In this tutorial, we wanted to present you with a twist on this traditional technique, and show you how you can make beautiful vintage style ornaments, starting from modern blank spun cotton shapes.

Making your ornements from blank spun cotton shapes – The basics

We love to work with blank spun cotton shapes because it is fast and convenient. There is no need to create a shape out of batting, just use an already existing one. The shapes come in literally hundreds of different forms: fruits, balls, teardrops…

Spun cotton blank unpainted shapes

Just like traditional spun cotton ornaments, spun cotton shapes originated in Germany. They are made of soft paper, rolled by machines inside of a mold.

Blank shapes can be painted (acrylic craft glue works great), covered with glittered (sugar style glass glitter give them a terrific vintage look), glued to other materials…

Icing on the cake, unless glass ornements, spun cotton shapes are shatter proof.

Altering the shape of the shapes – yes it’s possible!

It is possible (and easy) to compress the shapes a little bit in some areas to create ridges and small depressions. For example, you can alter ball shapes into pumpkins, peaches, oranges or plums for exams.

Peach spun cotton ornament DIY

In the above picture, we made a ridge into a ø40mm ball. We will then use it to make a lovely glittered peach ornament.

To dent or compress the shapes, simply spray a fine mist of water on them, and use a tool to apply pressure (the handle of a metal spoon will work just fine). Let dry and voila :)

Use a wooden pick and don’t get paint on your fingers

Why not use the hole that is inherent to all of the shapes to hold your spun cotton ornaments with a pick while you work on them? It’s very convenient.

spun cotton apple ornament vintage

You can also use the wooden pick to rest the shape while the paint dries. When you are done painting or decorating, simply insert the stick in a piece of foam, or just rest it in a heavy cup.

Easily add hanging loops to your ornaments

Since all shapes have a hole on one side, it’s easy to add a hanging loop.

Strawberry spun cotton ornaments DIY

You can easily fabricate a little hanging device by looping a short piece of wire around the handle of a paintbrush. Once done, simply insert it into the hole of the shape. For a secure bond, pour a little glue into the hole before inserting the metal loop.

A few of our vintage style Christmas ornament creations

Vintage angel ornaments

We love our cute little angels and fashioned them from the 47mm tall peg doll shapes. Once painted, we dressed them with lace and created the wings with fluffy white bump chenille. You can visit our full tutorial page for all the details.

Strawberry spun cotton ornaments DIY

Glittered Plum Ornaments

We made our plums from ø40mm spun cotton balls and used German glass glitter to coat them.

The first step was to create a ridge along one side of the spun cotton ball. To do so, spray mist a little water on the ball and with the handle of a spoon (or a similar object), press down to create the ridge. Let dry

Then, paint the ball with purple acrylic paint. Try to blend a little bit of grey into your purple to create a more vintage color.

The leaves are made with white cardstock, painted to the desired color. Or you can simply use a dark green color cardstock if you have some, but we think it looks better if you paint your own cardstock. When the pain is dry, glue a piece of metal wire on the back side of the leave. This piece of metal wire should overhang by 2 cm.

Time to add glitter! Cover the plum and the leave with regular white craft glue (use a paint brush) and sprinkle the glitter over with a spoon. Tap of the excess. Wait a few hours until the glue is completely dry.

Almost done! Make a hanging loop (see instructions above), cover the tip of the loop with glue and insert into the plum. Without waiting, cover the tip of the wire overhanging from the leaf with glue and insert into the plum as well. You are all set :)

Spun Cotton Sugar Plum Vintage Glittered Ornaments

Vintage Lemon Ornaments – WATCH OUR VIDEO TUTORIAL

To make these sparkling beauties, we used our blank lemon shapes. The process is very similar to the one we used to make the sugar plums ornaments.

vintage lemon ornaments christmas DIY

Vintage Apple and Pear ornaments

TIP : to give your ornaments a vintage-y look, try to avoid colors that are too bright or too flashy. Instead, incorporate into the paint a small amount of grey. Give them this antique Victorian style look that caracterizes vintage ornaments.

Spun Cotton Ornament glittered peach Victorian Christmas

Vintage Peach Spun Cotton Ornament

To make the peach, we used a ø 50mm spun cotton ball. However, you could also use ø40 or ø45 balls and the peaches would still look great.

One of the most difficult thing with peach ornaments is to blend the yellows, the reds and the oranges and create realistic ombre effects. You may have to practice a little. It is important to work with all colors at the same time, so one doesn’t dry out before the other.

TIP: Spray mist a little water onto the blank ornament before adding the paints. This way, the cotton won’t absorb the paint too quickly and the paint won’t dry too fast. You will have more time to work on a perfect color transition.

However, don’t sweat it too much, people will be impressed even if your blending technique isn’t perfect. And don’t forget: a little sugar makes everything better :)

Spun Cotton Ornament glittered peach Victorian Christmas

Elves with felt scarves spun cotton ornaments

This one is a little different from the others because we used a string to create the hanging loop instead of using a piece of metal. We used ø 20 mm balls for the heads, painted them with a solid color, and simply dabbed 2 black dots for the eyes. The felt hats are stitched in the back and glued onto the heads. We used hot glue to fold the scarves and to attach them to the heads.

elf felt hanging ornaments spun cotton DIY

Happy Crafting with SPUNNYS
Please feel free to leave a comment or contact us

Veröffentlicht am 2 Kommentare

Christmas pipe cleaner Santa figurines – project ideas and tips

Christmas pipe cleaner ornaments

You can make beautiful and Adorable Christmas Santa figurines by combining pipe cleaner and spun cotton shapes. Below you can checkout a few a of our cutest projects and read about a few tips that we thought were relevant.

Project Pictures:

pipe cleaner santas vintage bump chenille DIY

Vintage Santas – Christmas pipe cleaner ornaments
25mm spun cotton eggs, bump chenille, regular chenille

Pipe cleaner santa claus ornaments easy christmas DIY

The vintage santa ornaments in three different colors
The heads were made with spun cotton eggs (25mm tall)

pipe cleaner santa claus craft project ideas

The head of the miniature Santa is made with a spun cotton cone (15mm) glued on top of a spun cotton ball (15mm)

vintage inspired santa ornament pipe cleaner folk art

Vintage inspired Santa

Santa Claus Christmas pipe cleaner ornament

Santa Claus with a pipe cleaner hat. 47 mm tall spun cotton peg doll. 

More Project Pictures – Christmas angels, elves, and snowmen

Vintage style pipe cleaner angel ornament Christmas

 Angel – Christmas pipe cleaner ornament
Spun cotton peg doll, lace, bump chenille, gold pipe cleaner

Christmas gnome pipe cleaner ornament

Forest gnome – 47 mm spun cotton peg doll

Vintage inspired bump chenille pipe clenaer Christmas ornaments

Vintage inspired Eskimo spun cotton ornaments

Christmas crafts pipe cleaner ornaments

Snowman Christmas pipe cleaner ornament and candy cane scarf

arctic crafts pipe cleaner figure

 Christmas pipe cleaner Eskimo ornament

Tips and tricks to make your own pipe cleaner Christmas ornaments:

pipe cleaner man candy cane scarf christmas ornament DIY

Tip #1: It’s ok if you don’t twist and bend your pipe cleaners in the exact same fashion as I did. Your christmas ornaments will look great no matter what.

Tip #2: To make your Christmas pipe cleaner ornaments even softer, you could use „plush“ pipe cleaners. It will make the ornaments soft and fluffy.

Tip #3: To make your ornaments look cute, one trick is to use small size spun cotton shapes. For the eskimos for example, I used 12mm spun cotton balls. I feel like miniature anything is almost always cute.

Tip #3: To make the candy cane and the scarf, all you have to do is twist two pipe cleaners into one.

Tip #4: To twist pipe cleaners together, use a pair of pliers. It’s easier on the fingers. I like the round nose pliers because they are also useful to bend pipe cleaners into perfect loops.

Tip #5: To draw the face of your Christmas pipe cleaner ornaments, a regular ball pen works great. There is no need for any special tool.

This is it. I hope you enjoy this page and that it motivated you to try making your own Christmas pipe cleaner figurines. As always, if you have any questions, do not hesitate to comment. Happy Crafting!

Veröffentlicht am Schreib einen Kommentar

Homemade Snowman Figurines – DIY Christmas decorations:

homemade snowman ornaments DIY christmas decorations

Follow our tutorial and learn how you can make these adorable miniature snowman figurines, all geared up with cute little felt hats and pipe cleaner scarfs. You can also turn the figurines into Christmas Ornaments by adding little hanging loops on top of the hats (more on this below).

DIY christmas decoration ideas snowman ornament

Project materials

To make one snowman figurine, you will need:

  • A small piece of felt
  • A pipe cleaner (aka chenille)
  • Needle and white thread (or a sewing machine if you have one)
  • A spun cotton peg doll (I used the 51mm tall one because it is shaped like a snowman already).
  • A small piece of golden thread to make the hanging loop
  • A black ball pen
  • A piece of cardboard or strong paper (to make the hat template).
  • OPTIONAL: white craft glue.

Snowman Figurines – Step by Step Directions

1:  Make your hat template:

On a piece of cardboard, draw a 5″ diameter circle and divide in 4 equal quarters. If you are going to sew your hat by hand: cut out one exact quarter. However, if you are going to use a sewing machine, your pie slice should be a little larger than 90º (see picture above).

2: Hem the bottom of your pie wedge from end to end.

3: Step 3 (for sewing machine users only).

Cut off your hemmed pie wedge to an exact 90º quarter pie slice.

4: Finish sewing your hat

Now is the time to add a hanging loop to your snowman figurine if you later wish to hang it. Fashion the hanging loop by cutting a small piece of string and tie the two ends together. Before sewing the two edges of the hat together, place the loop inside the fold, and make sure the knotted end of the string is the end that sticks out (see step 4 picture).

Fold the piece of felt in half (bad side out) and sew the two edges together.

5: Turn the hat inside out.

You can use a pen or a stick to help.

6: Dress your figurine for winter

Put the hat on your figurine’s head. Normally it should fit without glue but you can add a little bit of tacky glue if necessary. When you are done, tie a small piece of pipe cleaner around the neck of your snowman and give it a couple twists.

7: Draw the face.

With the ball pen, draw the eyes and the mouth.

How to display your snowman figurines – A few ideas

Use a string hanging loop

This is the method hat was described in the tutorial above.

Use a piece of pipe cleaner

Each doll blank has a little hole underneath it. To display your figurines on the Christmas tree, you can wrap a piece of pipe cleaner around a branch and mount your figurine onto the other end of the pipe cleaner (see picture below).

A few more snowman figurine decoration ideas

Here are a few ideas that you can use for inspiration:

I hope you enjoyed this tutorial and that you got a few ideas for your own Christmas decoration projects. Happy Holidays and as always, feel free to leave a comment below or share your ideas with us.

Veröffentlicht am Schreib einen Kommentar

How to make Pipe Cleaner Penguins – Winter DIY crafts

pipe cleaner penguins christmas craft ideas

Check out our easy tutorial and learn how to make these irresistible mini pipe cleaner penguins. They are great to decorate the house during the Holiday season and only require a few inexpensive materials.

Pipe cleaner penguins – List of materials needed

To make one pipe cleaner penguin, you will need:

1) One 10mm diameter Spun Cotton Ball and one 18mm Spun Cotton Egg. The resulting pipe cleaner penguin will be about 1.5 inches tall. For a bigger penguin, you can use larger balls and larger eggs.

2) One small strand of orange pipe cleaner and one small strand of black pipe cleaner.

3) A black ball pen, a dab of orange paint (acrylic is fine), and a very fine paint brush.

4) A pair of wire cutters and a pair of pliers.

The basic technique for this craft is to squeeze spun cotton shapes inside of pipe cleaner strands.

When a piece of pipe cleaner is twisted around a spun cotton shape, it creates pressure around the shape and locks it into place.

penguin winter craft ideas

Step by step instructions

1: Prepare the feet and the head.

For the feet, simply make a doughnut with a small piece of orange pipe cleaner.
For the head, grab a spun cotton ball and draw the eyes with the ball pen and paint a small nose with the orange paint. I used a toothpick to hold the ball.
IMPORTANT: Make sure the ball’s hole is on top of the head, not on the bottom.

spun cotton ball penguin

2: Tighten the pipe cleaner around the penguin’s head

Wrap the pipe cleaner around the head and give it 3 to 4 twists. Make sure the pipe cleaner is tight around the ball before you start twisting. You can use the pliers to help.

penguin figurine tutorial

3: Tighten the pipe cleaner around the penguin’s body and feet

With one hand, hold the feet and the body of your penguin together and with the other hand, twist and tighten the 2 strands of pipe cleaner around them.

TIP: position the portion of the feet where the two ends of the pipe cleaner meet towards the back where it doesn’t show.

penguin figurine DIY

4: Cut off the excess pipe cleaner.

You can also leave the two strands uncut and use them to display your penguin.

DIY pipe cleaner penguins

You are done :)

hope you enjoyed this tutorial. You can also use the pipe cleaner and spun cotton shape technique to create different pipe cleaner animals such as rabbits or bears – the possibilities are endless.

Thank you for reading, good luck with your penguin projects, and happy crafting!

Veröffentlicht am Schreib einen Kommentar

How to make mini Christmas Ball Ornaments – Holiday DIY Crafts

DIY mini christmas balls ornaments

Check out our tutorial and learn how you can make your own mini Christmas Ball Ornaments using spun cotton balls as lightweight / shatterproof fillers. Miniature ornaments are perfect to decorate small size Christmas trees or to make your own wreaths.

Mini Christmas Ball Ornaments Tutorial – The short version

To make one mini ball ornament, follow these three easy steps:

(1) Paint a spun cotton ball
(2) Pour glue in the hole
(3) Insert a metal loop.

Tutorial – The long version

Materials:

To make mini Christmas ball ornaments, you will need:

– Small gauge metal wire or a pack of ornament hooks.
– A pair of wire cutters and a pair of round nose pliers.
– 18mm and 20mm Spun cotton balls.
– Paint and a paint brushes.
– Toothpicks.
– A glue gun or some regular white craft glue.
– A glossy finish such as glossy mod podge
– OPTIONAL : glitter

1. Paint the balls.

DIY miniature christmas ball ornaments drying

Balls drying up on bamboo sticks

Mount the spun cotton balls on wooden picks and paint them with solid colors. Spun cotton balls are made of paper and paint very easy.

2. Add a gloss finish

For a shiny look, dip your mini Christmas ball ornaments in glossy mod podge and wait until it hardens.

3. Prepare your hanging loops:

Loop short pieces of metal wire around your round nose pliers and twist the ends together. When done, cut off the excess wire with a wire cutter. If you do not have round nose pliers, you can loop wire around the handle of your painbrush to create the loop.

4. Glue the hanging loops to the balls.

You can use a glue gun or regular white craft glue. Both have pros and cons. With a glue gun, you will work a lot faster, but with regular glue, you won’t leave glue marks on top of the balls.

Pouring hot glue

Pour a small amount of glue in the hole, and insert a metal loop right away. Note that all spun cotton balls have little holes.

You are done :)

I hope you enjoyed this tutorial. Note that spun cotton balls come in plenty of sizes and that you could use the same technique to make regular size Christmas ball ornaments as well.

Happy Holidays to all of you!

Veröffentlicht am Schreib einen Kommentar

How to make Christmas ball ornaments from spun cotton balls – DIY Holiday Crafts

homemade painted christmas ornaments

Check out our tutorial and learn how you can make your own hanging Christmas ball ornaments from spun cotton balls.

DIY Christmas Ball Ornaments – project materials:

  • ø 45 mm Spun cotton balls (or larger). Spun cotton balls are lightweight and shatterproof.
  • Acrylic Paint and brushes.
  • Decorative string or ribbon.
  • Glue gun and white tacky glue
  • Scissors
  • Optional and to your liking: glitter, gem, sequin, trims, Dresden …
blank christmas balls
ø 45 mm spun cotton balls

Step by step directions

Start with the paint

Paint the spun cotton balls with one solid color. They will be dry to the touch in less than 20 minutes.

Continue with some glitter

Glue some glitter on. The best way to glue glitter is to brush a little bit of white tacky glue on your ornament, sprinkle the glitter on, and tap the ornament to loosen off the excess glitter. The tacky glue will dry to a clear finish and the glitter will be solidly attached.

Add more decorations

With tacky glue, you can glue on ribbons, trimming, Dresden, Sequins, decorative gems, and more. You can also use a glue gun to work faster but the finish won’t be as nice because the glue gun will leave glue marks.

Add a hanging loop to your ornaments.

There are several technique that you could use here.

  1. Make a hanging loop out of decorative string or ribbon, and wrap the string all around the ornament.
  2. Make a hanging loop out of small gauge metal wire (picture on the left) or buy one already made (picture on the right). Pour a little glue in the spun cotton ball hole and insert the metal hanging loop.

You are done :) I hope that you enjoyed this tutorial and as usual, if you have any questions, do not hesitate to leave a comment. Happy Crafting!

Veröffentlicht am Schreib einen Kommentar

How to make a nutcracker figurine with spun cotton balls – DIY Christmas Crafts

Nutcracker DIY christmas craft idea ornament

Check out our easy tutorial and learn how you can make your own Christmas Nutcracker figurine with just a few spun cotton balls.

Nutcracker Figurine – project materials

  • Spun cotton balls : a 45mm ball for the body, a 30mm ball for the head, and two 15mm balls for the hands.
  • Red and blue acrylic paint, a black marker, and a gold paint pen.
  • A black ball pen, a wine cork, a bamboo skewer (or tooth pick).
  • Glue (glue gun or tacky glue).
  • A small piece of cardboard or foam pad for the pedestal.
  • A pair of scissors.

Step by step directions

  • Paint the largest ball and the wine cork red. You can use the wooden pick to hold the ball while you paint it.
  • While the paint dries, draw the face on the medium size ball with the ball pen.
  • When the red paint is dry, use the black marker to draw the shirt and the belt.
  • Use the gold paint pen to draw the buttons, and the trim at the bottom of the hat.
  • Paint the pants blue.
  • Glue all the pieces together.
  • Build the pedestal stand. Draw a circle on the cardboard and cut out with a pair of scissors. Glue to the bottom of your nutcracker to its pedestal.

You are done :)

.

nutcracker DIY Christmas figurine

Did you know?

Nutcrakers originated in the Erzgebirge mountains, a beautiful region located in Eastern Germany.

I hope you enjoyed this tutorial. As always, if you have any questions, do not hesitate to use the comment section below.

Veröffentlicht am Schreib einen Kommentar

How to make a Snowman Figurine from spun cotton balls – Winter Crafts DIY

DIY spun cotton snowman ornament

Check out our step by step tutorial and learn how you can make a snowman figurine with a few spun cotton balls.

DIY snowman figurine – materials

  • One 45mm diameter spun cotton ball for the body
  • One 30mm diameter ball for the head
  • Two 15mm diameter balls for the hands.
  • A glue gun or white tacky glue.
  • A pair of scissors.
  • Two black peppercorns for the eyes.
  • Orange foam pad for the nose (or a piece of cardboard painted orange).
  • A piece of cardboard to make a pedestal
  • A wood twig and a few pine needles to make the broom.
  • Optional : card stock paper and black paint to make the hat.
Snowman ornament DIY craft idea
ø 30 mm spun cotton ball

Step by step directions

1/ Glue the head and the two hands onto the body. If you would like to hang the snowman figurine as an ornament instead of displaying it on a pedestal, make sure to have the little hole in the head pointing up. You can then insert and glue a hanging loop in this hole.

Spun cotton ball ornament hook
You can buy hanging loops or make your own

2/ Glue the peppercorns onto the snowman’s face.

3/ Cut out the nose in the piece of foam pad and glue onto the snowman figurine.

4/ Glue your snowman onto its pedestal base so it can stand up on its own.

5/ Use the glue gun to make the miniature broom by gluing together the twig and the pine needles. Glue to the snowman’s hand.

Christmas figurines DIY craft idea

You are done :)

You can use the same technique to create other Christmas figurines, here are a few project ideas that you can use for inspiration.

I hope you enjoyed this simple snowman figurine tutorial. Happy crafting and as always, do not hesitate to get in touch if you have any questions!